How to Reactivate an Expired Upload Page
Learn how to turn off expiration for a SendToDrive upload page so an expired form can start accepting files again without recreating it.

If your SendToDrive upload page says it has expired, you usually do not need to recreate the page.
This can happen when an upload page was created on the free plan, where upload pages can expire after a limited time. After upgrading to a paid plan, the page may still keep the expiration setting that was already saved on that page.
To make the upload page active again, open the page settings and turn off expiration.
Quick Fix
- Log in to SendToDrive.
- Go to My Upload Pages.
- Select the upload page that says expired.
- Open Settings.
- Find Enable expiration.
- Uncheck Enable expiration.
- Click Update.
After saving, open your upload page link again. The page should be active and ready to accept uploads.
Step 1 - Log In to SendToDrive
Go to sendtodrive.com/signin and sign in with the Google account connected to your SendToDrive account.
Use the same Google account that owns the upload page you want to reactivate.
Step 2 - Open My Upload Pages
After logging in, open My Upload Pages from your dashboard or account menu.
This page lists the upload pages you have created, including pages that are currently active, inactive, or expired.
Step 3 - Select the Expired Upload Page
Find the upload page that shows as expired and open it.
You do not need to create a new upload page unless you want a separate link or a different destination folder.
Step 4 - Open Settings
Inside the upload page, open the Settings menu.
This is where you can manage the upload page title, description, destination folder, upload rules, file limits, password protection, and expiration.
Step 5 - Turn Off Expiration
Look for the Enable expiration setting.
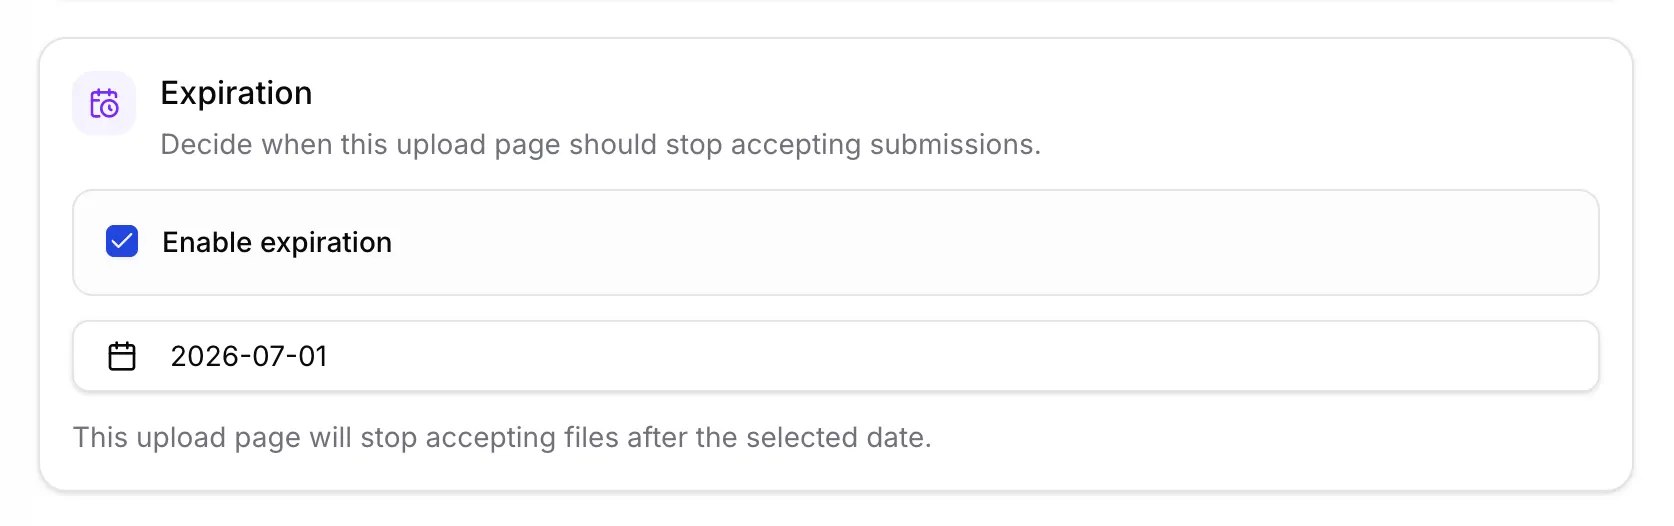
When Enable expiration is checked, the upload page will stop accepting files after the selected date.
If it is checked, the upload page has an expiration date. To reactivate the page permanently on a paid plan:
- Uncheck Enable expiration.
- Review the rest of your settings.
- Click Update.
Once the update is saved, the upload page should no longer be expired.
Why the Page Can Still Say Expired After Upgrading
Upgrading your subscription unlocks paid-plan features, including upload pages without expiration.
However, if an existing upload page already has an expiration date saved, that setting can remain on the page until you change it. Turning off Enable expiration tells SendToDrive that the page should not expire.
What to Check If It Still Looks Expired
If the upload page still says expired after saving:
- Refresh the upload page link in your browser.
- Make sure you clicked Update after unchecking Enable expiration.
- Confirm that you edited the correct upload page.
- Check whether the page has another access rule enabled, such as password protection.
- Contact SendToDrive support if the page still does not accept uploads.
When contacting support, include the upload page title or link so we can find it faster.
Summary
An expired SendToDrive upload page can usually be reactivated in a few clicks:
My Upload Pages -> select page -> Settings -> uncheck Enable expiration -> Update
Your existing upload page link, QR code, destination folder, and previous uploads can stay the same.